Configure the Machine to Obtain an IP Address Using DHCP
- Product support for
- Phaser 3635MFP
- Article ID
- KB0046982
- Published
- 2015-09-17
NOTE: To configure a static IP address, DHCP must be disabled, and then the designated address can be entered. See the Related Content for additional information.
To obtain an IP address using DHCP:
When the Phaser 3635MFP is powered on the first time after installation, it automatically uses DHCP to obtain its network configuration. This assumes that the machine is operating correctly and is connected to an Ethernet network connection. See the Related Content for additional information.
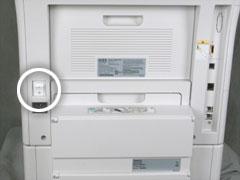
Power on the machine by pressing the power switch to the [|] (on) position.
After the machine is powered on, it negotiates with the DHCP server for an IP address. Wait two minutes for the network setup to complete. During this process, the machine will obtain its address from the DHCP server.After the machine has finished rebooting, print the System Configuration Report. See the Related Content.
In the Name / Address section of the System Configuration Report, confirm that an IP address has been assigned and that it is a valid IP address for the network.
NOTE: If the IP address starts with 169.xxx.xxx.xxx, the DHCP server has not properly assigned an IP address or DHCP is not enabled on the machine or on the network. Contact a Network Administrator for assistance.
Related Content
Configure the Machine for TCP/IP With a Static (Manual) IP Address
Connect the Phaser 3635MFP to an Ethernet Network Using TCP/IP