Make Sure SMart eSolutions is Setup Correctly. Configure the Proxy Server, and Create a Machine Digital Certificate (if Required) Using CentreWare Internet Services (CWIS)
- Product support for
- WorkCentre 5135/5150, WorkCentre 5632/5638, WorkCentre 5645/5655
- Article ID
- KB0220516
- Published
- 2015-09-23
IMPORTANT: Auto Supplies Replenishment (ASR) requires device connectivity. If a device loses connectivity, ASR will cease and the customer will need to place manual supplies orders. Once connectivity is reestablished, the process for automatic delivery of supplies is re-initiated in Europe with no further customer intervention. In US and Canada, ASR will resume once a manual order (phone or web) is placed after reconnection. For questions regarding ASR, contact your regional metered supplies help desk.
NOTE: Users may be required to login as a System Administrator to view or modify settings within CWIS. If prompted, login using the System Administrator username and password. The default username is "admin", and the default password is "1111".
From a computer, open an Internet browser window.
Enter the IP address of the machine in the Address field, and then press [Enter] on the keyboard. The CentreWare Internet Services Description and Alerts page will be displayed.
NOTE: The IP address of the machine can be found on the Configuration Report. See the Related Content for additional information.
Click on the [Properties] tab.
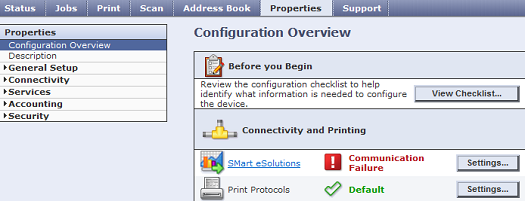
Click on [Configuration Overview] in the Properties section on the left side of the page. The Configuration Overview window will be displayed.
View the status displayed for SMart eSolutions in the Connectivity and Printing area.
If a "Fully Configured and Communicating with Xerox" message is displayed, the setup has been successful. No further action is required.
If a "Communication Failure" message is displayed, continue with step 6.
NOTE: Communication failure may be due to the use of a proxy server for Internet access. The proxy server must be setup to allow SMart eSolutions.
Click on [General Setup] on the left side of the page, and then click on [SMart eSolutions].
When a proxy server must be enabled:
If "Not Configured" is displayed for the HTTP Proxy Server, continue with step 8.
If "Configured" is displayed for the HTTP Proxy Server, skip to step 14.
If a proxy server is not required, skip to step 14.

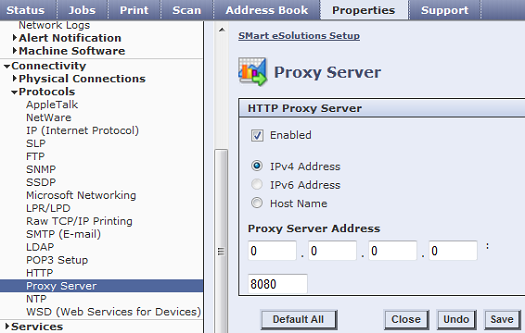
Click on the [Configure] button. The Proxy Server window will be displayed.
NOTE: Machines cannot be connected directly with a proxy server that requires authorization or authentication (login and/or password). If authorization or authentication is required, proxy connectivity software, Xerox Device Agent (XDA) or CentreWare Web must be used.
To access the required software download link(s) and documentation, go to the Xerox SMart eSolutions website. See the Related Content for additional information.Select the [Enabled] check box.
Select either [IPv4 Address], [IPv6 Address] or [Host Name].
Enter the IP address or Host name and port number in the Proxy Server Address field.
Click on the [Apply] or [Save] button. An acknowledgment message will be displayed. Click on [OK].
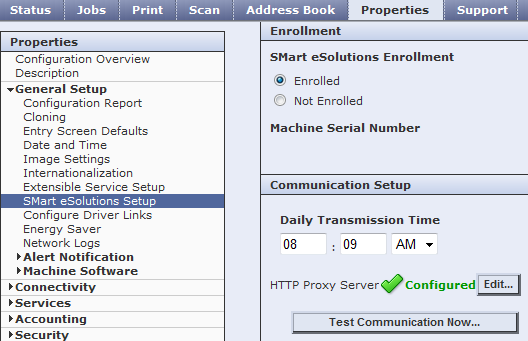
Click on [SMart eSolutions Setup] in the Properties / General Setup menu and make sure "Configured" is displayed for the HTTP Proxy Server.
NOTE: If "Configured" is not displayed, check the steps again or contact Support for additional assistance.Click on [IP (Internet Protocol)] in the Properties / Connectivity / Protocols menu.
Check that the correct details are entered for:
Gateway Address
Domain Name
Preferred (Primary) DNS Server address

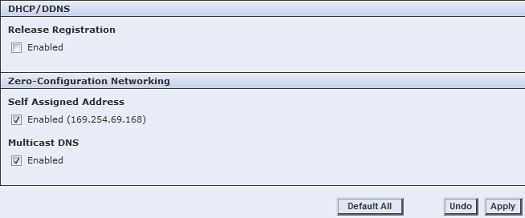
Make sure that the DHCP/DDNSRelease Registration [Enabled] check box is not checked (not enabled).
Make sure that the Zero-Configuration NetworkingSelf Assigned Address and Multicast DNS [Enabled] check boxes are selected (enabled).
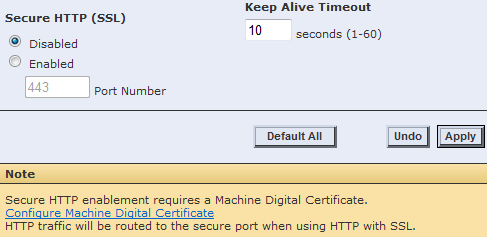
Click on [HTTP] in the Properties / Connectivity / Protocols menu:
If Secure HTTP (SSL) is enabled with a port of 443, continue with step 26 to test communications.
If Secure HTTP (SSL) is not enabled, a Machine Digital Certificate must be created. Continue with step 19.

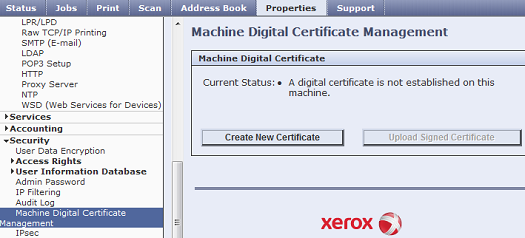
Click on the [Configure Machine Digital Certificate] link in the Note section of the window. The Machine Digital Certificate Management window will be displayed.
Click on the [Create New Certificate] button.
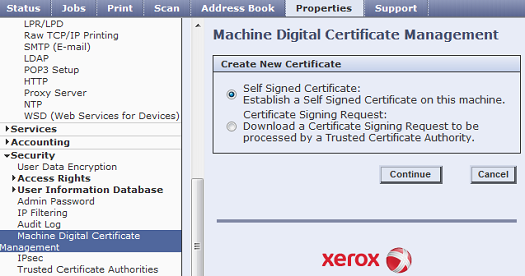
Click on the [Self Signed Certificate] radio button.
Click on [Continue].
Enter the applicable certificate information:
2 Letter Country Code
State / Province Name
Locality Name (Company Name)
Organization Name (Business Group Name)
Organization Unit (Type of Business Name)
E-mail Address
Days of Validity
NOTE: It is recommended that the Days of Validity is set to 9999 - the maximum available value.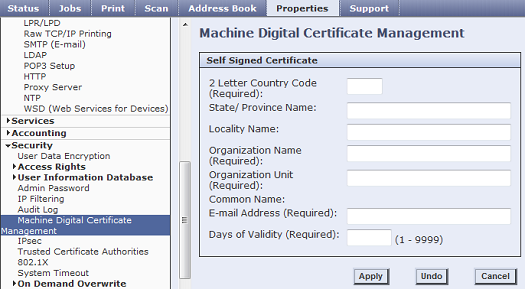
Click on the [Apply] button. A confirmation that the certificate has been created will be displayed.
Click on [HTTP] in the Properties / Connectivity / Protocols menu. If required:
Select [Enable] for the Secure HTTP (SSL) and check that the port is set to 443.
Click on the [Apply] button.
Click on [SMart eSolutions Setup] in the Properties / General Setup menu.
Click on the [Test Communication Now] button to test communication with the Xerox Communication Server. The machine will try to establish communication with the Xerox Communication Server. This may take several minutes.
If communication is established, a "Communication with Xerox successful" message will be displayed. Continue with step 28.
If a communication error message is displayed, or the Communication Test window is displayed for more than a few minutes (maximum 5 minutes), communication has failed. Contact Support for additional assistance.
Click on [Configuration Overview] in the Properties section on the left side of the page.
Make sure that a "Fully Configured & Communicating with Xerox" message is displayed for SMart eSolutions in the Connectivity and Printing area.
NOTE: If a "Communication Failure" message is displayed, contact Support for additional assistance.