Connect the Device for Fax and Configure Basic Fax Settings
- Product support for
- Xerox B215 Multifunction Printer
- Article ID
- KB0326386
- Published
- 2020-01-31
You can use Fax to fax documents to a fax number, or individual contact, or to a group of contacts. When you send a fax from the printer control panel, the document is scanned and transmitted to a fax device, using a dedicated telephone line.
Step 1: Connect the Device for Fax
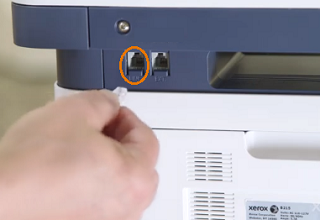
Connect a telephone line cord into the LINE port on the back of the device.

Connect the other end of the cord into a dedicated telephone line jack.
Step 2: Configure Basic Fax Settings
Basic fax settings can be configured from the control panel using the Fax Wizard or via a web browser using CentreWare Internet Services (CWIS). Note that the printer must be connected to a wired (Ethernet) or wireless network and have a valid IP address to use CWIS to configure fax settings.
Using the Fax Wizard:
At the printer control panel, press the Home button.
Touch Device.
Touch App Defaults
Touch Fax Setup.
Touch Fax Wizard.
Follow the on-screen wizard to:
Enter the Fax Line Number
Enter the Fax Line Name
Set the Dial Type
Set the Country
When you have completed the Fax Settings Wizard, the device requests a Restart.
Touch Restart.
Using CentreWare Internet Services (CWIS):
From a computer (on the same network as the printer) open a Web browser.
In the Web browser address field, enter the IP address of the printer and then press Enter or Return. The CWIS home page will be displayed.

Click Fax.
Note: Many features in CWIS require an administrator user name and password to access or modify. If prompted to enter Administrator Account login details:For User Name, enter Admin.
For Password, enter the administrator account password that was set during initial access to CWIS.
Click OK.
To configure Fax line settings, for Fax Line Setting, to edit a setting, click the Pencil icon.
For Machine Name, type a name for the printer.
For Fax Number, type the number for the line.
For Prefix Dial, type the dialing prefix.
For Line Configuration, select an option.
Select your country from the list.
Click Save.
Step 3: Send a Test Fax
For additional information, refer to Send a Fax.