How To Modify the Output Color Using the Color Options in the Print Driver
- Product support for
- VersaLink C8000 Color Printer, VersaLink C8000W Color Printer, VersaLink C9000 Color Printer
- Article ID
- KB0134881
- Published
- 2020-10-06
For Microsoft Windows
Note: Not all color correction options are supported on all printers. Some options apply only to a specific printer model, configuration, operating system, or print driver type.
Color Corrections
The Color Correction options provide simulations of different color devices such as a monitor or printing press. Xerox Automatic Color is the default setting and is the recommended setting for general image processing.
Open the file to be printed.
Select File > Print.
Select the required printer, and then click on Printing Properties or Preferences.
Click on the Image Options tab.
Click on the Color Correction tab.
Select one of the following options from the Color Correction pull-down menu:
Xerox Automatic Color (Recommended)
LCD Display
sRGB Display
Vivid RGB
Vivid Color
Commercial
SWOP Press
Euroscale Press
None
sRGB Scientific
ISO Coated
ISO Uncoated
Japan Color
SPOT Color
FOGRA
GRACol
Custom Automatic Color
NOTE: Custom Automatic Color opens the Custom Color Correction window, which provides advanced users finer control over color adjustments. Click on the ? for additional information.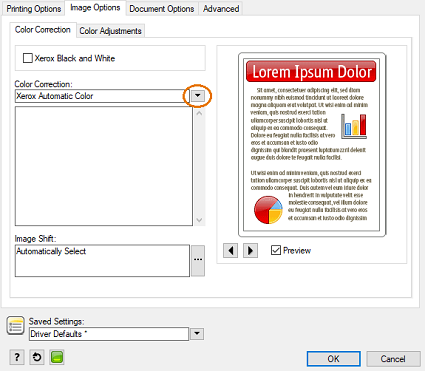
Color Adjustments
Use Color Adjustments to adjust particular characteristics of the printed color. Characteristics include lightness, contrast, saturation, and color cast.
Click on the Color Adjustments tab.
The following options are available to adjust:
Lightness - The Lightness feature allows you to adjust the overall lightness or darkness of the text and images in your printed job.
Contrast - You can use the Contrast feature to adjust the variation between light and dark areas of the print job.
Saturation - Saturation allows you to adjust the color strength and the amount of gray in the color.
Color Cast - Use Color Cast settings to adjust the amount of a selected color in the print job while preserving lightness. The following options are available:
Cyan to Red - allows you to adjust the color balance between cyan and red. For example, when you increase the cyan levels, the red levels decrease.
Magenta to Green - allows you to adjust the color balance between magenta and green. For example, when you increase the magenta levels, the green levels decrease.
Yellow to Blue - allows you to adjust the color balance between yellow and blue. For example, when you increase the yellow levels, the blue levels decrease.

For Apple Macintosh
NOTE: Not all color correction options are supported on all printers. Some options apply only to a specific printer model, configuration, operating system, or print driver type.
Color Corrections
The Color Correction options provide simulations of different color devices such as a monitor or printing press. Xerox Automatic Color is the default setting and is the recommended setting for general image processing.
Open the file to be printed.
Select Print from the File menu.
Select the required printer.
Select Xerox Features from the application pull-down menu.
NOTE: If the menu is not available, click on the Show Details button at the bottom left of the window.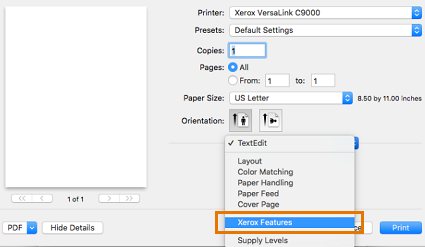
Select Image Options from the next pull-down menu.
Select from the following options.
Automatic Color (Recommended) - provides the best color correction to text, graphics, and images.
Vivid Color - produces brighter and more saturated colors.
Xerox Black and White - converts all colors to grayscale, producing a black and white version of the document.
Custom Color Options. Select this option to view the Custom Color Options window where additional color corrections are available. A Color Adjustment tab is also available to adjust particular characteristics of the printed color. See the Color Adjustment section below for additional information.
Black and White
Commercial
sRGB Display
Vivid RGB
LCD Display
sRGB Scientific
Vivid Color
Euroscale Press
SWOP Press
ISO Coated
ISO Uncoated
Japan Color
FOGRA
GRACol
Spot Color
None
Custom Automatic Color
NOTE: Custom Automatic Color opens the Custom Color Correction window, which provides advanced users finer control over color adjustments. Click on the ? for additional information.
Color Adjustments
Use Color Adjustments to adjust particular characteristics of the printed color. Characteristics include lightness, contrast, saturation, and color cast.
Click on the Color Adjustments tab.
The following options are available to adjust:
Lightness - The Lightness feature allows you to adjust the overall lightness or darkness of the text and images in your printed job.
Contrast - You can use the Contrast feature to adjust the variation between light and dark areas of the print job.
Saturation - Saturation allows you to adjust the color strength and the amount of gray in the color.
Color Cast - Use Color Cast settings to adjust the amount of a selected color in the print job while preserving lightness. The following options are available:
Cyan to Red - allows you to adjust the color balance between cyan and red. For example, when you increase the cyan levels, the red levels decrease.
Magenta to Green - allows you to adjust the color balance between magenta and green. For example, when you increase the magenta levels, the green levels decrease.
Yellow to Blue - allows you to adjust the color balance between yellow and blue. For example, when you increase the yellow levels, the blue levels decrease.