Perform Color Calibration
- Product support for
- VersaLink C8000 Color Printer, VersaLink C9000 Color Printer
- Article ID
- KB0134825
- Published
- 2019-10-14
Use Color Calibration to maintain consistent colors. You can adjust the color density, gray balance, or both. For the best results, adjust the color density, then adjust the gray balance.
At the start of each color calibration procedure, three pages are printed.
An instruction sheet explaining the calibration and evaluation procedures that are used for both color density calibration pages, and the gray balance calibration pages.
An initial Color Reference Page with color density patches, ranging from 5 percent to 100 percent. Mark this initial page to identify it from the final Color Reference Page, which is printed automatically at the completion of your adjustments. Comparing the initial print with the final print allows you to compare visually the results of your adjustments.
A calibration page that changes, based on the adjustment procedure. The calibration page is your primary tool for evaluating when an adjustment is required. To allow you to repeat an adjustment until the calibration is complete, this page reprints each time you make an adjustment. All colors on a calibration page reflect the previous adjustments. An adjustment is complete when the center, or zero, position shows the best available color setting.
Color Density Calibration
Adjusting color density allows you to calibrate the density and balance of the four primary colors of cyan, magenta, yellow, and black. The density settings adjust the printed output, based on the level of color saturation. If you select the minus settings, the color density decreases and the output lightens. If you select the plus settings, the color density increases and the output darkens. Examples of low density areas include faces and sky.
Cyan/Magenta Calibration Page |
|---|
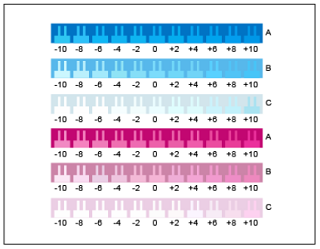 |
The third page printed at the start of your color density adjustment is the Cyan/Magenta Calibration Page. This page contains a range of density settings available for cyan and magenta. The current density setting for each of the light, medium, and dark rows are numbered zero. The available settings are printed in a comb pattern, against a background representing the desired density setting. |
Starting a Color Density Calibration
To begin your calibration and print the calibration pages:
At the printer control panel, press the Home button.
Log in as administrator.
Press the Log In button.
Touch or type admin.
Type the administrator password, then touch OK.
Note: Depending on when the device was manufactured, the default password may be the device serial number or 1111.
Touch Device > Support > Color Calibration.
To select the type of lighting you use for viewing calibration pages, touch Lighting Type, then touch a selection.
To select the Color Density adjustment, touch Color Density Only.
To begin your calibration and print the calibration pages, touch Next.
To run the calibration procedure, follow the onscreen instructions, or refer to Performing a Color Density Calibration.
Performing a Color Density Calibration
To perform a Color Density Calibration:
To evaluate the current calibration for cyan and magenta density, hold the Cyan/Magenta Calibration page at an arm length away.
Note: To obtain accurate adjustments, ensure that your environment lighting matches the Lighting Type selected in Starting a Color Density Calibration.To determine the best match, evaluate the comb pattern in the dark cyan and magenta rows, labeled A. Mark the section where the bottom comb most closely blends into the background color. If the best match is between two combs, write down a number value between the two printed comb values. A close match for the zero comb means that the row is calibrated.
If the best comb for any row is a value other than zero, an adjustment is required. On the touch screen, touch Edit, then for that color, touch A, then move the slider to the value you want.When finished, to save the values and print a revised calibration page, touch OK.
Repeat the process by marking the best match for the medium and light rows, labeled B, and C.
Using the updated calibration page, repeat the process until the best comb for every cyan and magenta row is zero. To continue to the green and black color density adjustments, touch Next.
Hold the green and black calibration page at an arm length away and follow the previous adjustment procedure, but for green and black.

When the best match for every green and black row is zero, touch Next.
To complete your calibration, follow the onscreen instructions, or refer to Evaluate and Save Your Color Density Calibration below.
Evaluate and Save Your Color Density Calibration
To evaluate your calibration and save your settings:
To see the results of your adjustments, compare your initial and final Color Reference Pages.
To save the adjustments, touch Save and Exit. Otherwise, touch Exit Without Saving.
To return to the Support menu, touch the back arrow.
To return to the Home screen, press the Home button.
Gray Balance Calibration
Adjusting gray balance calibrates cyan, magenta, and yellow color balances so that they closely match pure black at the same color intensity.
Light Gray Calibration Page |
|---|
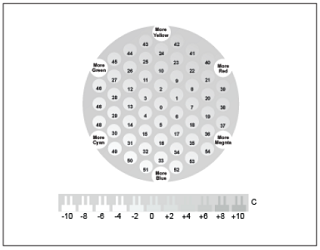 |
The third page printed at the start of a gray balance calibration, is the Light Gray Calibration Page. This page uses circles, or hexagons, of color to demonstrate the available gray balance settings. The current gray balance setting is the circle in the center, numbered zero. Each available setting is printed against a background representing the desired gray balance setting. To demonstrate the available lightness/darkness calibration settings, the row at the bottom of the page contains comb patterns. The comb pattern labeled zero is the current setting. Together, the gray balance circles and lightness/darkness combs allow for an accurate gray balance setting |
Starting a Gray Balance Adjustment
To begin your calibration and print the calibration pages:
At the printer control panel, press the Home button.
Log in as administrator.
Press the Log In button.
Touch or type admin.
Type the administrator password, then touch OK.
Note: Depending on when the device was manufactured, the default password may be the device serial number or 1111.
Touch Device > Support > Color Calibration.
To select the type of lighting you use to view calibration pages, touch Lighting Type, then touch a selection.
To select the Gray Balance adjustment, touch Gray Balance Only.
To begin your calibration and print the calibration pages, touch Next.
To run the calibration procedure, follow the onscreen instructions, or refer to Performing a Gray Balance Calibration below.
Performing a Gray Balance Calibration
To perform a Gray Balance Adjustment:
To evaluate the gray balance settings, hold the light-gray calibration page at an arm length away.
To determine the best light-gray balance match, evaluate the circles. Mark the circle that appears to be the most neutral gray. The center circle, zero, is the current gray-balance setting.
To determine the best lightness/darkness match, evaluate the comb patterns in row C. Mark the section where the comb most closely blends into the background color. If the best match is between two combs, write down a number value between the two printed comb values. A close match for the zero comb means that the lightness/darkness is calibrated.
If the best color match for a circle or a comb is a value other than zero, an adjustment is required. On the touch screen, touch Edit.
To adjust the circle setting, touch Light Hexagon Number. Use the keypad to enter the number for the best circle, then touch OK.
To adjust the lightness/darkness setting, touch Light Bar Number, then move the slider to the value you want.
When finished, to save the values and print a revised calibration page, touch OK.
Using the updated light calibration page, repeat the process until the best choices for both sections are zero.
When the best match for both sections is zero, to continue on to the next color adjustment, touch Next.
Repeat this process for the medium and dark calibration pages.
To exit the adjustment procedures, touch Next.
To complete your calibration, follow the onscreen instructions, or refer to Evaluate and Save Your Gray Balance Calibration below.
Evaluate and Save Your Gray Balance Calibration
To evaluate your calibration and save your settings:
To see the results of your adjustments, compare your initial and final Color Reference Pages.
To save the adjustments, touch Save and Exit. Otherwise, touch Exit Without Saving.
To return to the Support menu, touch the back arrow.
To return to the Home screen, press the Home button.