Clean the Printhead (LED) Lenses
- Product support for
- VersaLink C8000 Color Printer, VersaLink C8000W Color Printer, VersaLink C9000 Color Printer
- Article ID
- KB0134828
- Published
- 2020-10-06
The printer is constructed with four printhead lenses. The printhead lenses require regular cleaning to maintain print quality. Clean the printhead lens every time the associated drum cartridge is replaced, or if print quality starts to degrade. For example, if prints have voids or light streaks through one or more colors, use the following instructions to clean the LED lenses.
Warning: If you accidentally get toner on your clothes, lightly dust them off as best as you can. If some toner remains on your clothes, use cool water, not hot, to rinse off the toner. If toner gets on your skin, wash it off with cool water and a mild soap. If you get toner in your eyes, wash it out immediately with cool water and consult a doctor.
Caution: Do not perform this procedure when the printer is copying or printing.
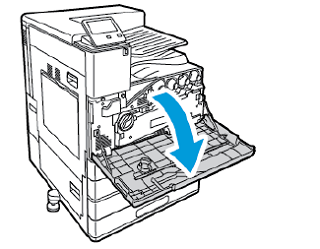
Open the front door of the printer.

Remove the waste toner transport unit:
To unlock the waste toner transport unit, rotate the locking lever 45 degrees counterclockwise.

To release the waste toner transport unit, press both orange tabs as shown, then pull out the unit from the printer.

Place the removed waste toner transport unit on a level surface, with the openings facing up.

Caution: To avoid toner spills, do not lay the waste toner transport unit face down, or on its side.
Remove the printhead LED lens-cleaning rod from inside the front door.

Slowly push the cleaning rod into the printer until it stops, then pull out the rod. Repeat this action two more times.

Return the cleaning rod to its original location.

To insert the waste toner transport unit:
Position the waste toner transport unit as shown.

Press the waste toner transport unit toward the printer, until both ends click into place.

To lock the waste toner transport unit, rotate the locking lever 45 degrees clockwise.

Close the printer front door.