Configure Wi-Fi Direct
- Product support for
- Xerox B215 Multifunction Printer
- Article ID
- KB0326383
- Published
- 2021-01-07
Note: You can connect to your printer from a Wi-Fi mobile device, such as a tablet, computer, or smart phone, using Wi-Fi Direct. Wi-Fi Direct is disabled by default, to enable it follow the steps listed below.
Configuring Wi-Fi Direct Using Xerox CentreWare Internet Services
Note: If you are accessing Xerox CentreWare Internet Services for the first time after printer installation, you will be prompted to change the default Administrator Account password. The initial default password is the printer serial number. For additional information, refer to Change the System Administrator Password for CentreWare Internet Services (CWIS).
From a computer (on the same network as the printer) open a Web browser.
In the Web browser address field, enter the IP address of the printer and then press Enter or Return. The CWIS home page will be displayed.

Click Properties.
Note: Many features in CWIS require an administrator user name and password to access or modify. If prompted to enter Administrator Account login details:For User Name, enter Admin.
For Password, enter the administrator account password that was set during initial access to CWIS.
Click OK.
Click Connectivity.
Click Protocols.
Click Wi-Fi Direct.
For Wi-Fi Direct, select On.
For Device Name, type a name to appear in a list of available wireless networks and devices.
For IP Address, use the default or type a new IP Address.
To set the printer as Group Owner for a Wi-Fi Direct group, similar to a wireless access point, select Activate.
Enter a Network Key or use the default value.
To hide the Network Key, select the check box.
Click Apply.

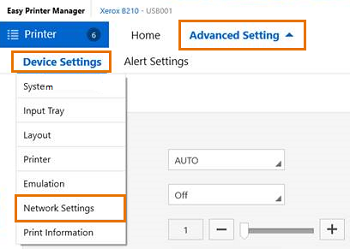
Configuring WiFi Direct Using Easy Printer Manager
Open the Xerox Easy Printer Manager program.
At the computer, click search and type Xerox Easy Printer Manger.
Click on Xerox Easy Printer Manager to open the program.
Select Advanced Settings, hover over Device Settings, then select Network Settings.
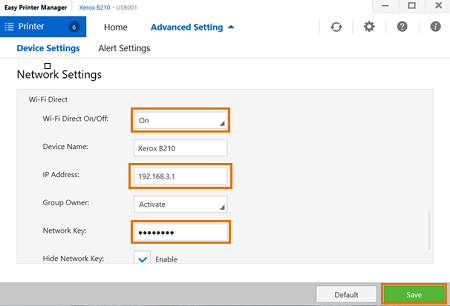
For WiFi Direct, select On to enable the feature.
Make note of the IP Address displayed. For example, 192.168.3.1. This address will be used later to access the printer's web interface (CentreWare Internet Services).
For Network Key, enter a password that contains at least 8 characters. This password will be used later to connect to the printer's WiFi Direct signal.
Click Save to save the settings.
From the WiFi capable device (a Windows 10 PC in this example), connect to the printer's WiFi Direct signal:
On the Windows taskbar at the bottom, right of the screen, click on the network icon (
 or
or  ) and then click on the printer's WiFi Direct signal.
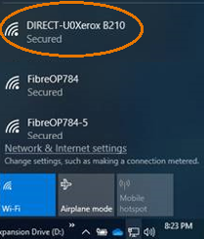
A prompt to enter a network key will be displayed. Enter the password created in step 5, and then click OK to connect.