Configure SMTP (Email) Settings Using Xerox CentreWare Internet Services (CWIS)
- Product support for
- Xerox B215 Multifunction Printer
- Article ID
- KB0326394
- Published
- 2019-08-27
Note: If you are accessing Xerox CentreWare Internet Services for the first time after printer installation, you will be prompted to change the default Administrator Account password. The initial default password is the printer serial number. For details, refer to Change the System Administrator Password for CentreWare Internet Services.
Email settings apply to all services that use SMTP, including Internet and Scan to Email.
Before you begin:
Create an email account for the printer. The printer uses this address as the default text in the From: field of the email.
Ensure you have connection information for your email service provider - server address and port number.
Ensure you have login information for the email account - username or email address and password.
Identity security requirements, such as TLS and Encryption.
Configuring Email Settings Using CentreWare Internet Services (CWIS)
If your printer is connected to your computer through a wired or wireless network connection, use Xerox CentreWare Internet Services to configure the Email settings.
Note: If your printer is connected to your computer using a USB cable connection, the Email service is not available.
Configuring the Server to Send Emails (SMTP) Settings
Note: The images in this procedure are for demonstration purposes only and may not specifically match your printer model; differences in colors, icons, available tabs/menus and supported options/settings may exist.
From a computer (on the same network as the printer) open a Web browser.
In the Web browser address field, enter the IP address of the printer and then press Enter or Return. The CWIS home page will be displayed.

Click Properties.
Note: Many features in CWIS require an administrator user name and password to access or modify. If prompted to enter Administrator Account login details:For User Name, enter Admin.
For Password, enter the administrator account password that was set during initial access to CWIS.
Click OK.
Click Services.
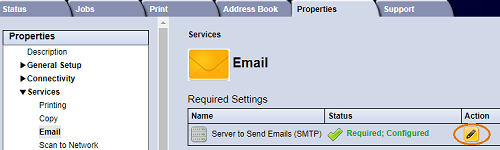
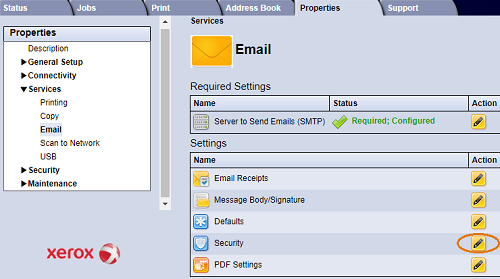
Click Email.
To access SMTP server settings, for Server to Send Emails (SMTP), click the Pencil icon.
For SMTP Server Information, complete the following steps.
To set auto discovery, for Auto Discover SMTP Server, select the check box or enter the SMTP Server Domain.
Note: Before selecting this option, check if the feature is supported by your network.For Name or IP Address, select one of the following options to identify your SMTP server:
IP Address
Host Name
For SMTP Server IPv4 Address and Port, type the appropriately formatted IP Address or Host Name of your server and change the default port number (25) as needed.
For Device Email Address (From), type the email address of the printer.
If the SMTP server requires authentication, for SMTP Authentication, complete the following steps.
For Server Requires SMTP Authentication, select the check box.
Type the Login Name and Password used to access the server. To update the password for an existing Login Name, for Select to save new password, select the check box.
For Connection Encryption, select a protocol that your server supports, then for Validate Server Certificate, select Enable.
To define a maximum message size for emails with attachments, for Maximum Email Size (Message and Attachment), select a size.
Click Apply.
If prompted, enter your password, then click OK.

Configuring Email Receipts
From a computer (on the same network as the printer) open a Web browser.
In the Web browser address field, enter the IP address of the printer and then press Enter or Return. The CWIS home page will be displayed.
Click Properties.
Note: Many features in CWIS require an administrator user name and password to access or modify. If prompted to enter Administrator Account login details:For User Name, enter Admin.
For Password, enter the administrator account password that was set during initial access to CWIS.
Click OK.
Click Services.
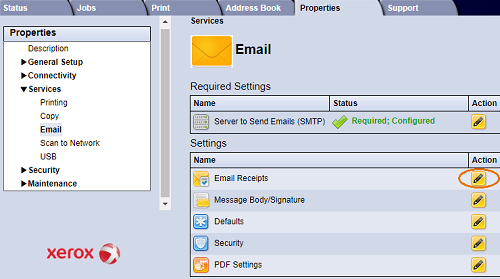
Click Email.
For Email Receipts, to edit a setting, click the Pencil icon.
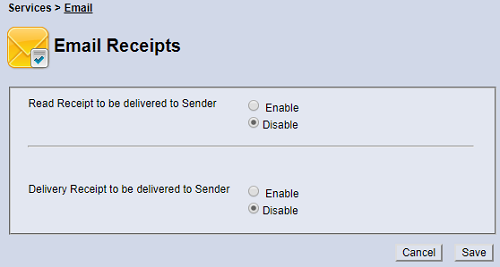
Select Enable or Disable for the following:
Read Receipt to be delivered to Sender
Delivery Receipt to be delivered to Sender
Click Save.
Configuring Message Body/Signature Settings
From a computer (on the same network as the printer) open a Web browser.
In the Web browser address field, enter the IP address of the printer and then press Enter or Return. The CWIS home page will be displayed.
Click Properties.
Note: Many features in CWIS require an administrator user name and password to access or modify. If prompted to enter Administrator Account login details:For User Name, enter Admin.
For Password, enter the administrator account password that was set during initial access to CWIS.
Click OK.
Click Services.
Click Email.
For Message Body/Signature, to edit a setting, click the Pencil icon.

To allow users to modify the email message body text, click Always Allowed.
To change the message body text, edit the text shown in the Message Body box.
To add signature text, type the text in the Signature box.
Click Save.

Configuring the From Edit Policies
From a computer (on the same network as the printer) open a Web browser.
In the Web browser address field, enter the IP address of the printer and then press Enter or Return. The CWIS home page will be displayed.
Click Properties.
Note: Many features in CWIS require an administrator user name and password to access or modify. If prompted to enter Administrator Account login details:For User Name, enter Admin.
For Password, enter the administrator account password that was set during initial access to CWIS.
Click OK.
Click Services.
Click Email.
For From Edit Policies, to edit a setting, click the Pencil icon.

Select the editing policies and display name options required.
Click Save.
Configuring Email Defaults
From a computer (on the same network as the printer) open a Web browser.
In the Web browser address field, enter the IP address of the printer and then press Enter or Return. The CWIS home page will be displayed.
Click Properties.
Note: Many features in CWIS require an administrator user name and password to access or modify. If prompted to enter Administrator Account login details:For User Name, enter Admin.
For Password, enter the administrator account password that was set during initial access to CWIS.
Click OK.
Click Services.
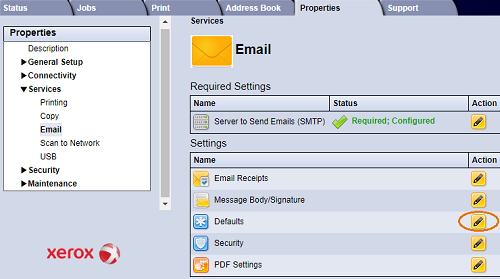
Click Email.
For Defaults, click the Pencil icon.
Select the appropriate tab:
To modify email settings, select the Email Settings tab.
To modify the input settings, select the Input Settings tab.
To modify the output settings, select the Output Settings tab.
In the Default column, click Edit.
Modify the settings as needed.
Click Save. A modification confirmation window is displayed, click OK.
Click Close.

Configuring Address Book Policies
From a computer (on the same network as the printer) open a Web browser.
In the Web browser address field, enter the IP address of the printer and then press Enter or Return. The CWIS home page will be displayed.
Click Properties.
Note: Many features in CWIS require an administrator user name and password to access or modify. If prompted to enter Administrator Account login details:For User Name, enter Admin.
For Password, enter the administrator account password that was set during initial access to CWIS.
Click OK.
Click Services.
Click Email.
For Address Book Policies, to edit a setting, click the Pencil icon.

To configure the Address Book settings stored in the printer, for Device Address Book, click Edit.
To set permissions for the Device Address Book, select Permissions from the address book menu. To allow users to create or edit contacts in the Device Address Book from the printer control panel, select Open to All Users.
To allow users to locate email addresses in the Device Address Book, for Use Device Address Book, select Yes. To hide the address book from users, select No.
To use a network address book and configure LDAP server settings, for Network Address Book (LDAP), click Edit. To configure a default LDAP server, click Add, then enter the LDAP directory information.
If an LDAP network address book is configured, to allow users to locate email addresses in the Network Address Book, select Yes. To hide the address book from users, select No.
Click Save.
Configuring Email Security
From a computer (on the same network as the printer) open a Web browser.
In the Web browser address field, enter the IP address of the printer and then press Enter or Return. The CWIS home page will be displayed.
Click Properties.
Note: Many features in CWIS require an administrator user name and password to access or modify. If prompted to enter Administrator Account login details:For User Name, enter Admin.
For Password, enter the administrator account password that was set during initial access to CWIS.
Click OK.
Click Services.
Click Email.
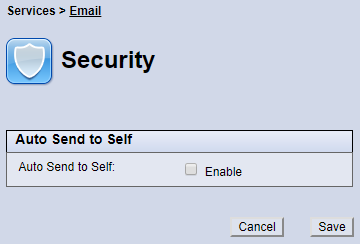
To edit security settings, for Security, click the Pencil icon.
For Auto Send to Self, select Enable.
Click Save.
Configuring PDF Settings
From a computer (on the same network as the printer) open a Web browser.
In the Web browser address field, enter the IP address of the printer and then press Enter or Return. The CWIS home page will be displayed.
Click Properties.
Note: Many features in CWIS require an administrator user name and password to access or modify. If prompted to enter Administrator Account login details:For User Name, enter Admin.
For Password, enter the administrator account password that was set during initial access to CWIS.
Click OK.
Click Services.
Click Email.
For PDF Settings, to edit a setting, click the Pencil icon.

To use Flate Compression Capability, click Enable.
Click Save.
