Configure Google Cloud Print Using CentreWare Internet Services (CWIS)
- Product support for
- Xerox B210 Printer
- Article ID
- KB0327129
- Published
- 2021-02-23
Note: Google Cloud Print is not longer being supported by Google. Check the related content for some alternatives to print from the cloud.
Note: If you are accessing Xerox CentreWare Internet Services for the first time after printer installation, you will be prompted to change the default Administrator Account password. The initial default password is the printer serial number. For additional information refer to Change the System Administrator Password for CentreWare Internet Services (CWIS).||2108330
Google Cloud Print allows you to print documents from a device connected to the Internet, without using a print driver. You can send documents to the printer from anywhere, including documents stored in the cloud, a personal computer, tablet, or smartphone.
Before you begin:
Set up a Google email account.
Configure the printer to use IPv4.
Configure Proxy Server settings as needed.
Note: Verify that the security configuration of your firewall supports Google Cloud Print.
To register the printer to Google Cloud Print Web printing service:
From a computer (on the same network as the printer) open a Web browser.
In the Web browser address field, enter the IP address of the printer and then press Enter or Return. The CWIS home page will be displayed.
Click Properties.
Note: Many features in CWIS require an administrator user name and password to access or modify. If prompted to enter Administrator Account login details:For User Name, enter Admin.
For Password, enter the administrator account password that was set during initial access to CWIS.
Click OK.
Click Connectivity.
Click Protocols.
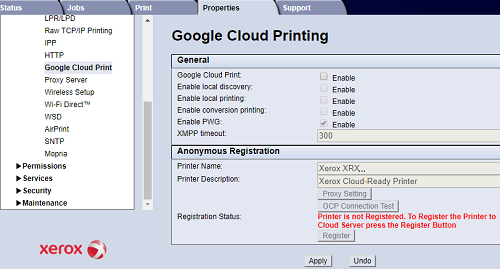
Click Google Cloud Print.
To enable Google Cloud Print, for Google Cloud Print, click Enable. Enable other services as needed.
To allow discovery and printing for local network devices, for each function that you want to allow, select Enable.
To allow format conversion for jobs that are in a format not supported by the printer, for Enable conversion printing, select Enable.
Note: Cloud Job Conversion uses both Google Cloud Printing and Local Printing. Currently, only specialized third-party apps require conversion. Xerox recommends that you leave Cloud Job Conversion disabled unless you use an app that requires it.To allow Printer Working Group (PWG) printing, for Enable PWG, select Enable.
To set a minimum time period before the Extensible Messaging and Presence Protocol (XMPP) times out, in the XMPP timeout field, type a number.
Review the information in the Anonymous Registration section. Modify settings as necessary.
To change the proxy server settings, click Proxy Setting.
To test the connection to the Google Cloud Print service, click GCP Connection Test.
To be redirected to the Google website, in the Anonymous Registration area, for Registration Status, click Register. At the prompt, click OK.
Log in to your Google email account.
To register the printer with Google Cloud Print, follow the on screen instructions.
To complete the printer registration and return to Xerox CentreWare Internet Services, click Finish Registration.
Note: Local discovery and local printing are enabled during printer registration. To disable either feature, for the feature, clear the Enable check box.
From the Google Cloud Print window in Xerox CentreWare Internet Services, click Apply.
To update the Registration Status displayed in your Web browser, refresh the Xerox CentreWare Internet Services Web page.
To access the Google Cloud Print feature, in your Google account, click Manage Your Printer. The default printer name appears in this format: Model name (MAC address).