Setup SMB Scanning to a Windows 10 PC
- Product support for
- AltaLink B8045 / B8055 / B8065 / B8075 / B8090 Multifunction Printer, AltaLink C8030 / C8035 / C8045 / C8055 / C8070 Color Multifunction Printer, Xerox EC8036 / EC8056 Color Multifunction Printer
- Article ID
- KB0031941
- Published
- 2021-07-15
This guide will assist in connecting a Xerox AltaLink C8000 Family or B8000 Family series device to an existing network and configuring scanning to a Windows 10 desktop from a factory default state.
Note: If the Printer is already connected and configured to the existing network skip to step 3. Note: There are videos available for Step 1, Step 2, Step 3 and Steps 4-9. For the full video playlist click here. |
Access the Control Panel as the System Administrator
Note: There is a video available at the end of these instructions.
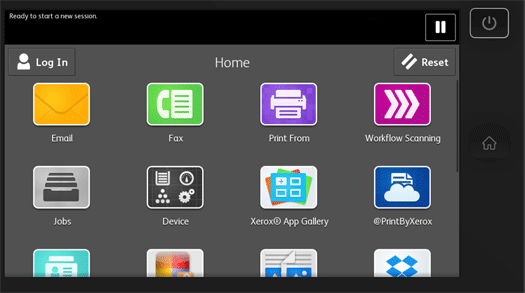
Touch Login at the device control panel touch screen.
Type admin.
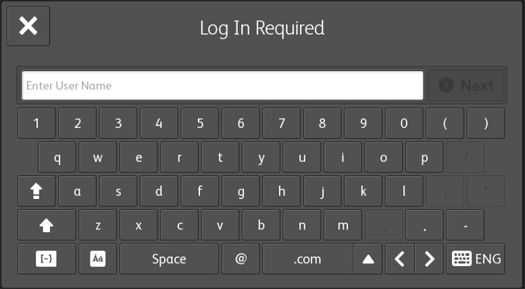
Touch Next.
Type the administrator password.
Note: Depending on the software version installed on the device, the default administrator password may be the device serial number or 1111. The password is case sensitive.
Touch Done.

Jump to Next Step: Configure the Network Address Manually at the Device Control Panel Touch Screen
Configure the Network Address Manually at the Device Control Panel Touch Screen
Note: There is a video available at the end of these instructions.
Pre-requisites:
The device is connected to your network via network cable to a switch or router.
The required network address information for the device provided by a network administrator.
Access the Control Panel as the System Administrator.
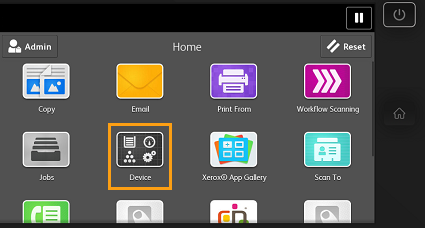
Press the Home button to return to the Home Screen.

Select the Device icon.
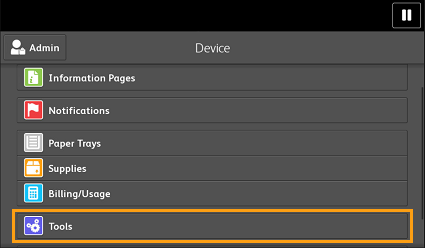
Select Tools.
Select Network Settings.
Select TCP/IP Settings.

Select Dynamic Addressing.

Select Disabled.

Select OK.
Select IPv4.

Enter the correct information for the local network into the following fields:
IPv4 Address.
IP Gateway.
Network Mask.

Select OK when finished.
Select Finish to apply the changes.


Jump to Next Step: Print a Configuration Report From the Control Panel
Print a Configuration Report From the Control Panel
Note: There is a video available at the end of these instructions.
Press the Home Key.
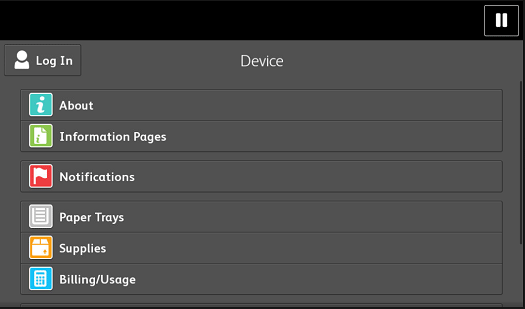
Select the Device icon.
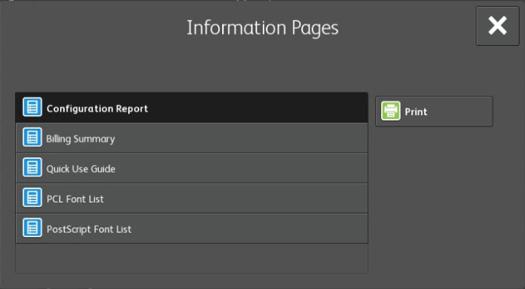
Select Information Pages.
Select Configuration Report.
Select Print to Print the Configuration Report.

Jump to Next Step: Create a New User and Set Account Type for Use with SMB Scanning
Create a New User for Use with SMB Scanning
Note: There is a video available for creating a user through configuring the repository at the end of this article
Note: You must have administrator rights on the Windows 10 computer to be able to create a new user.
Note: The steps for creating a new user on Windows 10 vary depending on the edition: Home or Professional.
For Windows 10 Home Edition:
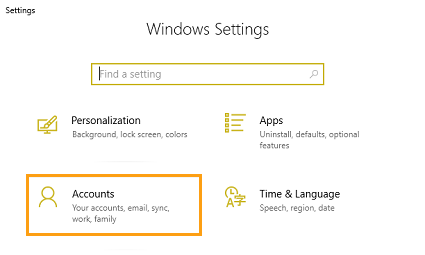
Open the StartMenu.
Select Settings.

Select Accounts.
Select Family & Other Users.

Select Add someone else to this PC. An account creation box will appear.
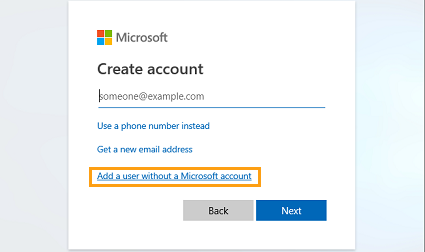
Select I don't have this person's sign-in information.

Select Add a user without a Microsoft account.
Enter a username for the scanning account in the Who's going to use this PC? field. (example: xeroxscans).

Enter a password under the Make it secure field.
Re-enter the same password on the second line.
Enter the required security questions and answers under the In case you forget the password section.
Select Next. The new account will be created.

Jump to Next Step: Create a Share Folder for SMB Scanning and Assign Access Permissions to the User
For Windows 10 Professional , Enterprise or Ultimate Edition:
Open a File Explorer window from the Windows taskbar.

Right click on This PC in the left side pane.
Select Manage. The Computer Management console will appear.

Select Local Users and Groups under System Tools.

Select Users.
Right click on an empty area within the user list pane.
Select New User.

Enter a User name into the User name field (example: xeroxscans).
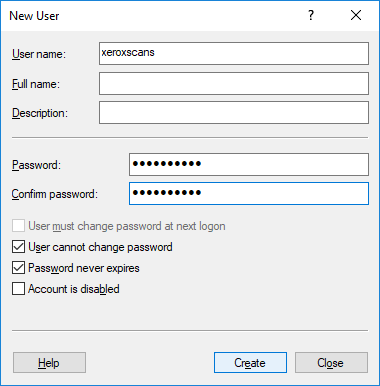
Enter a Password into the Password field.
Re-enter the Password into the Confirm Password field.
Uncheck the box marked User must change password at next logon.
Check the box marked User cannot change password.
Check the box marked Password never expires.
Select Create.
Close the Computer Management console window.
Jump to Next Step: Create a Share Folder for SMB Scanning and Assign Access Permissions to the User
Create a Share Folder for SMB Scanning and Assign Access Permissions to the User
Note: You must have administrator rights on the Windows 10 computer to be able to configure destination folder security privileges.
Open a File Explorer window from the Windows Taskbar.
Select drive C: from the left side pane.

Right click on an empty area within the drive contents pane.
Select New.
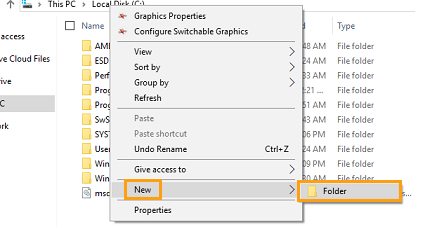
Select Folder.
Enter a name for the new folder (example: scans).
Right Click on the new folder.
Select Properties.

Select the Sharing tab.
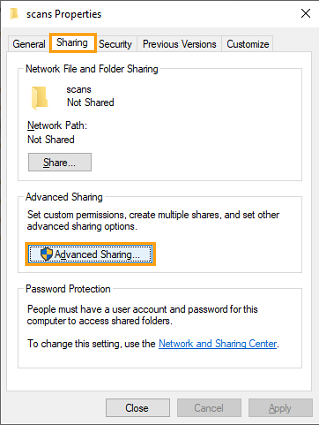
Select Advanced Sharing.
Select Share this folder.

Enter a name for the share into the Share Name field (example: scans).
Select Permissions.

Select Add.

Select Advanced.

Select Find Now.

Select the user account previously created from the list (example: xeroxscans).
Select OK.

Select OK.
Select the user account from the Share Permissions list.
Select Allow next to Full Control.
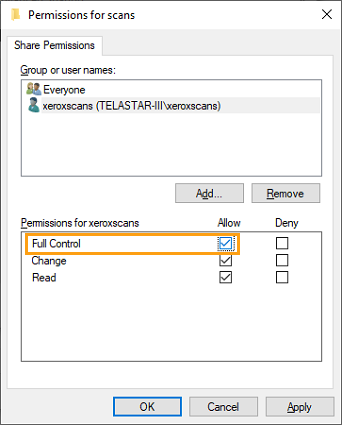
Select Apply.
Select OK.
Select OK.
Select the Security tab.

Select Edit to change permissions.
Select Add.

Select Advanced.
Select Find Now.
Select the user account previously created from the list (example: xeroxscans).
Select OK.
Select OK.
Select the user account from the Group or User Names list.
Select Allow next to Full Control.
Select Apply.
Select OK.
Close the Properties window.

Press and holdtheright mouse button on the new folder created.
Drag the Folder to the Windows Desktop while holding down the right mouse button.

Note: Make Sure to use the right mouse button for the drag operation.Release the folder on an empty space on the Windows Desktop. A dropdown menu will appear.

Select Create Shortcuts Here. A desktop shortcut to the scans folder will be created.
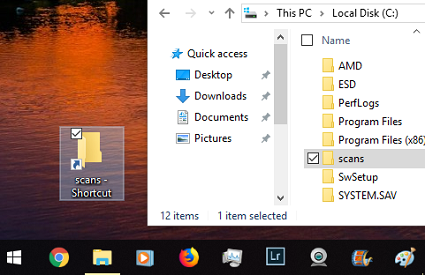
Note: Do not move or delete the shared folder on the hard drive once created. Moving or deleting the file will break the sharing attributes configured above and the share will no longer function.
Jump to Next Step: Determine the IP Address of the Windows Computer
Determine the IP Address of the Windows Computer
Open the Start Menu.
Type CMD into the search field.

Select Command Prompt.
Type the command IPCONFIG and press Enter.

The IPv4 Address will be displayed under the active network adapter (Ethernet or Wireless LAN). This Address will consist of 4 groups of numbers separated by periods (example: 192.168.1.150).

Jump to Next Step: Access the Embedded Web Server (EWS) as the System Administrator
Access the Embedded Web Server (EWS) as the System Administrator
Open a Web browser at your computer. In the address field, type the IP address of the device.

Press Enter or Return. The Embedded Web Server will be displayed.
Select Login In the top right area of the page.

For User ID, type admin.
For Password, type the administrator password. Depending on the software version installed on the device, the default administrator password may be the device serial number or 1111. The password is case sensitive.
Select Login.

Configure a File Repository for Scan to SMB on the AltaLink device from the Embedded Web Server
Access the Embedded Web Server (EWS) as the System Administrator.
Select the Properties tab.

Select Apps from the left side menu.
Select Workflow Scanning.
Select File Repository Setup.
Select Add New.

Enter a name for the repository into the Friendly Name field.
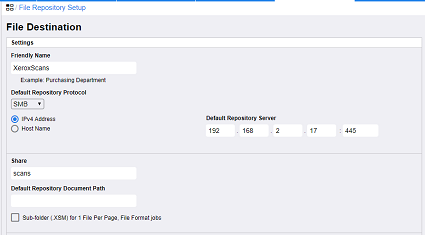
Select SMB from the Protocol dropdown.
Select the IPv4 Address radio button.
Enter the IP Address of the Computer into the IP Address field.
Type 445 into the Port field.
Enter the name of the previously created share folder (example: scans) into the Share field.
Select the Device radio button under Login Credentials to Access the Destination.

Enter the previously created username (example: xeroxscans) into the Login Name field.
Enter the password into the Password field.
Re-enter the password into the Retype Password field.
Select Save. The File Repository is now configured.
Jump to Next Step: Perform a Destination Test on the File Repository
Perform a Destination Test on the File Repository
Select the previously created File Repository from the Repository list.
Select Destination Test. A Pop-up box will appear.

Make sure the previously created username is in the Login Name Field.
Enter the Password for the user account into the Password field.

Select Start Test. The Printer is configured correctly if the test is successful.

Select Close.
Note: If the destination test is un-successful, please go through the guide again and ensure all relevant information is filled in correctly. If all configuration is correct and your setup is still not successful you might have issue with closed ports within your Windows Firewall Settings, Anti-Virus software that is blocking the communication between your computer and Xerox multifunction device.

