Fault Code 016-910, 016-911: Required Resource Not Ready
- Product support for
- VersaLink C400 Color Printer, VersaLink C405 Color Multifunction Printer
- Article ID
- KB0134243
- Published
- 2019-12-06
016-910 The paper requested by the selected print parameters are not installed.
016-911 The paper requested by the print specification are not loaded or different sizes and/or types of paper switching are requested from the same tray.
Verify the Paper Types Set in the Control Panel and the Print Driver Match the Paper Loaded in the Tray.
Check that Staples are correctly loaded.
Step 1: Load the Required Resources in Tray 1 or 2
Step 2: Modify the Paper Tray Settings
Step 3: Print a PDF as an Image File
Materials Required:
None
Step 1: Load the Required Resources in Tray 1 or 2
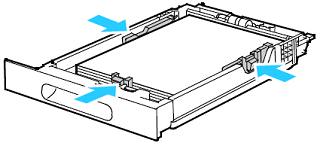
Remove the appropriate tray from the printer. Pull out the tray until it stops, lift the front of the tray slightly, then pull it out.
NOTE: This image is provided for demonstration purposes only. Your printer may vary slightly from the image provided.
Remove all paper from the tray.
At the back of the paper tray, press the paper lift tray down until it locks.
Adjust the paper length and width guides to the correct paper size.
Flex the sheets back and forth and fan them, then align the edges of the stack on a level surface. This procedure separates any sheets that are stuck together and reduces the possibility of jams.
Load paper into the tray as follows:
Load hole-punched paper with the holes to the left.
For 1-sided printing, load letterhead or pre-printed paper face-down with the top of the paper toward the back of the tray.
For 2-sided printing, load letterhead or pre-printed paper face-down with the top of the paper toward the back of the tray.
NOTE: Do not load paper above the maximum fill line. Overfilling the tray can cause the printer to jam. If necessary, update the paper type via the User Interface for Letterhead. See steps below.Adjust the length and width guides to fit the paper.
Slide the tray back into the printer.
Push the tray in all the way.
NOTES:If the tray does not go in all the way, make sure that the paper lift plate at the back of the tray is locked down.
If the tray is extended for legal size paper, the tray protrudes when it is inserted into the printer.
To protect the paper when the tray is extended, place the paper cover over the extended section of the paper tray.
If the control panel prompts you, verify the size and type on the screen.
To confirm the same paper size, type, or color, touch OK.
To select a new paper size, type or color, touch the current setting, then select a new setting. When you are finished, touch OK.
Try your job again. If the problem persists, continue with the next step.
Step 2: Modify the Paper Tray Settings
At the printer control panel, press the Home button.
Touch Device > Paper Trays.
In the Paper Trays menu, touch the required tray.
To set the level of restrictions on the paper tray, touch Tray Mode and select an option.
Touch Dedicated to dedicate the tray for a paper size, type, or color.
To select a paper or envelope size, touch the current size setting. From the list, select the size.
To select a paper type, touch the current paper type. From the list, select the paper type.
To select a paper color, touch the current paper color. From the list, select the paper color.
To allow the printer to select which paper tray to use, for Auto Select, click the enable toggle button.
To select a priority level for this paper tray, for Priority, touch the + or - to increment or decrement the number.
To save the setting, touch OK.
To return to the Home screen, press the Home button.
Try your job again. If the problem persists, continue with the next step.
Step 3: Print a PDF as an Image File
Problems can occur when you print a PDF file. For example, a PDF file can contains damaged content such as images or fonts that Acrobat cannot process during printing. Printing a PDF file as an image bypasses that processing by sending the printer a simple image of the document instead. Please note, this process can cause images and fonts to look slightly rougher, especially at the edges. If necessary, test print a different file.
Ensure that your printer is powered on and connected.
Within the PDF file, choose File > Print.
Click Advanced, and then select Print as Image.
Note: The location of the Advanced button and the Print as Image option depends on the version of Reader or Acrobat.Click OK to close the Advanced Print Setup dialog box, and then click OK to print.
Try you job again. If the problem persists, contact Support for additional assistance.