Replace the Imaging Unit
- Product support for
- WorkCentre 6505
- Article ID
- KB0230052
- Published
- 2021-02-02
CAUTION: Do not use warm water or cleaning solvents to remove Toner (Dry Ink) from your skin or clothing. This will set the Toner and make it difficult to remove. If any Toner gets on your skin or clothing, use a brush to remove the Toner, blow it off, or wash it off with cold water and mild soap.
Do not drop or shake the Imaging Unit after it has been removed from the printer as Toner spills can occur.
Do not expose the Imaging Unit to any light source for more than five minutes. Prolonged exposure to light may damage the unit. Cover the Imaging Unit with a light shield (such as a sheet of paper). Do not touch the shiny blue Transfer Belt.
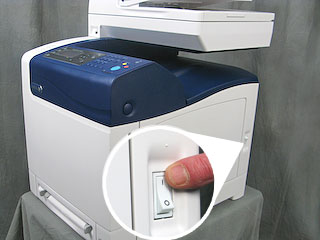
Power the printer off using the power switch located on the right side of the printer, toward the back.

Remove Tray 1.
Press the button on the top, right side of the printer to open the Front Cover.

Lower the Transfer Belt by pulling on the two green tabs.

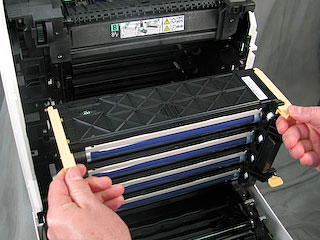
Locate the Imaging Unit, and then turn the four twist-locks to the left to unlock the unit.

Grasp the Imaging Unit by its peach-colored pull-tabs on the top edge. Pull the unit forward and up, and then out of the printer.
Place the used Imaging Unit in a bag and make sure the bag is properly sealed before discarding or recycling.
Remove the new Imaging Unit from the shipping container and the sealed package.
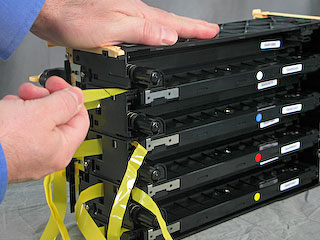
CAUTION: Do not remove the orange protective cover from the front of the unit until it has been installed in the printer. This will protect the Transfer Belt from being touched during installation.Place the Imaging Unit on a flat surface. Hold the unit firmly with one hand and with the other hand grasp the end tab of one sealing tape and pull the tape straight out, horizontally. Repeat for the remaining tapes; there are eight tapes in total. Make sure none of the tapes have broken. Discard of the tapes as normal office waste.
NOTE: If any tape breaks off with the remainder inside the Imaging Unit, stop the installation and contact Support.Grasp the new Imaging Unit by its peach-colored pull-tabs on the top edge and install the unit in the printer. Make sure to insert the unit into the guides in the printer, and then push the unit all the way back into the printer.

Turn the four twist-locks to the right to lock the unit.

Pull the orange protective cover out and then down from the top, center of the Imaging Unit.
Close the Front Cover.

Power the printer on. A "Ready to Print" message will be displayed on the Display Screen.