Fault Code 024-747: Print Request Failure - Incompatible Parameters
- Product support for
- VersaLink C8000 Color Printer, VersaLink C8000W Color Printer, VersaLink C9000 Color Printer
- Article ID
- KB0135930
- Published
- 2020-10-06
Try the following:
Step 1: Release a Held for Resources Job From the Active Jobs Screen
Jobs can be held or paused for various reasons. For example, if the printer is out of paper, or the correct paper Size, Type, or Color requested from the print job is not loaded or properly configured on one of the trays, the job is Held for Resources. Additionally, if you send a sample job, the first copy of the job prints and the rest of the copies hold until you release them. If the system administrator has configured the Hold All Jobs feature, any job sent to the printer is held until you release it.
Releasing a Held Print Jobs
At the Control Panel, press the Jobs button.
Select Active Jobs.
To determine why a job was held, select the job to view the Details.
Do one of the following:
To print the job held for resources, replenish the resources required. Be sure to configure the tray settings for the media loaded. The job resumes automatically when the required resources are available. If the job does not print automatically, touch Resume.
To delete the print job, touch Delete. At the prompt, touch Delete.
To release all held jobs, select Release All Jobs.
To return to the Home screen, press the Home button.
NOTE: If the job does not delete, cancel all held jobs by pressing and holding down the Power button until the machine shuts down. Wait until the Power light stops flashing before powering the printer back on.
Step 2: Make Sure the Tray Being Used for the Job is Configured With the Correct Paper Size and Type
When loading paper trays, make sure to program the tray with the correct paper size and paper type.
Step 3: Make Sure the Paper Type and Size is Set Correctly in the Print Driver
NOTE: These steps were performed on a computer with a Microsoft Windows 7 operating system. Steps will vary with other operating systems.
Select the Correct Paper Type and Size:
Open the file to be printed.
Click on File > Print.
Click on Printing Preferences or Properties to access the Xerox print driver settings.
Click on the Printing Options tab.
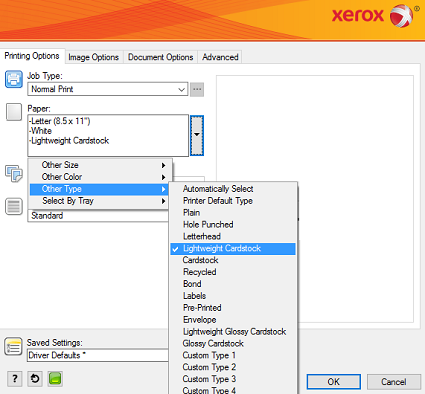
Click on the Paper pull-down menu, select Other Type, and then select the correct paper type. For example, Plain or Lightweight Cardstock.

Click on the Paper pull-down menu again, select Other Size, and then select the correct paper size.
Select any other required printing options.
Click on OK.
Click on OK or Print to send the job to the printer.
Step 4: Make Sure a Supported Print Driver is Being Used
Make sure a supported print driver is being used. It is recommended to use the PostScript (PS) print driver. Visit www.support.xerox.com to locate print drivers for this printer.