Configure DNS Settings Using CentreWare Internet Services (CWIS)
- Product support for
- Phaser 7800
- Article ID
- KB0091081
- Published
- 2016-11-10
Domain Name System (DNS) and Dynamic Domain Name System (DDNS) are systems that map host names to IP addresses.
NOTE: Users may be required to login as a System Administrator to view or modify settings within CentreWare Internet Services. If prompted, login using the System Administrator username and password. The default username is "admin", and the default password is "1111".
Open CWIS. See the Related Content for additional information.
Click on [Properties] at the top of the window.
Click on [Connectivity] to expand the list of options.
Click on [Protocols] to expand the list.
Click on [IP (Internet Protocol)], and then click on [DNS].
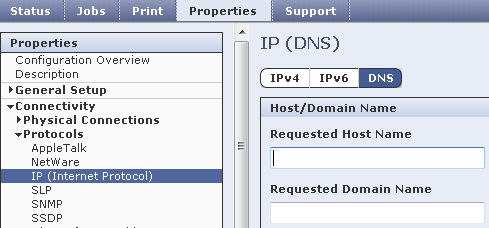
Enter a unique name for the printer in the Requested Host Name field.
NOTE: If the host name successfully registers to the DNS server, the host name will be displayed under Verified Host Name. The default host name is XRX_xxx, where xxx is the MAC address of the printer.
If no host name, or a different host name is displayed under Verified Host Name, the host name did not successfully register to the DNS server. Make sure that the network supports direct client DNS name registration, or configure the DHCP server to perform updates on behalf of the DHCP clients. Configure the DNS server to allow dynamic updates.Enter the name of the domain to which the printer is connected in the Requested Domain Name field.
NOTE: If the domain name successfully registers to the DNS server, the domain name will be displayed under Verified Domain Name.
If no domain name, or a different domain name is displayed under Verified Domain Name, the domain name did not successfully register to the DNS server. Make sure that the network supports direct client DNS name registration, or configure the DHCP server to perform updates on behalf of the DHCP clients. Configure the DNS server to allow dynamic updates.If necessary, click on the [Enabled] check box under Dynamic DNS Registration of IPv4 Address, or Dynamic DNS Registration of IPv6 Address.
NOTE: This option allows the DDNS server to register the host name of the printer automatically. If the host name is changed in CWIS, the registered host name will be updated on the DDNS server. Click on the [Enabled] check box to remove the check mark if the network does not support dynamic name addressing. Manage host names in the DNS server manually.If necessary, click on the [Enabled] check box under Remove this Device's IPv4 DNS Registration at power down.
NOTE: This option allows the printer to send a release request to the DHCP and DNS servers. If the servers grant the request, the current IP address and any dynamic DNS name are released when the printer is powered off.If necessary, click on the [Enabled] check box under Remove this Device's IPv6 DNS Registration at power down.
NOTE: This option allows the printer to release the current DHCP-assigned address and any DNS name when the printer is powered off.To allow users to see and connect to the printer using Bonjour, click on the [Enabled] check box under Multicast DNS Registration.
If you have a DHCP server, and the printer recognizes your DNS server, the address will be displayed under DNS Server Addresses. If you want to use other DNS servers, enter the IPv4 or IPv6 server address in the Additional DNS Server Addresses field(s).
Enter the time in seconds (1 - 60) that the printer waits if it fails to connect to a DNS server in the DNS Connection Timeout field. After the timeout period, the printer will attempt to connect to any additional DNS servers.
If you have a DHCP server, recognized search domain names are displayed under Domain Name Search List. The list of domain names allows the DNS server to recognize unqualified host names. To enable the printer to search for other domain names, enter the domain names in the Additional Search Domains field(s).
Click on the [Enabled] check box under Append Device Domain, to add the domain of the printer to the Domain Name Search List.
Click on the [Enabled] check box under Append Parent Domains, to add the parent domains of the printer to the Domain Name Search List.
Click on the [Apply] button.
Close the browser window.