Configure Proxy Server Settings Using CentreWare Internet Services (CWIS)
- Product support for
- Xerox B215 Multifunction Printer
- Article ID
- KB0326439
- Published
- 2019-08-26
Note: If you are accessing Xerox CentreWare Internet Services for the first time after printer installation, you will be prompted to change the default Administrator Account password. The initial default password is the printer serial number. For additional information refer toChange the System Administrator Password for CentreWare Internet Services (CWIS).
A proxy server acts as a go-between for clients seeking services and servers that provide them. The proxy server filters client requests and if the requests meet the proxy server filtering rules, it grants the request and allows the connection.
A proxy server has two main purposes:
To keep any devices behind it anonymous for security purposes.
To cache content from resources, such as Web pages from a Web server, to increase resource access time.
Configure Proxy Server Settings:
Note: The images in this procedure are for demonstration purposes only and may not specifically match your printer model; differences in colors, icons, available tabs/menus and supported options/settings may exist.
From a computer (on the same network as the printer) open a Web browser.
In the Web browser address field, enter the IP address of the printer and then press Enter or Return. The CWIS home page will be displayed.

Click Properties.
Note: Many features in CWIS require an administrator user name and password to access or modify. If prompted to enter Administrator Account login details:For User Name, enter Admin.
For Password, enter the administrator account password that was set during initial access to CWIS.
Click OK.
Click Connectivity.
Click Protocols.
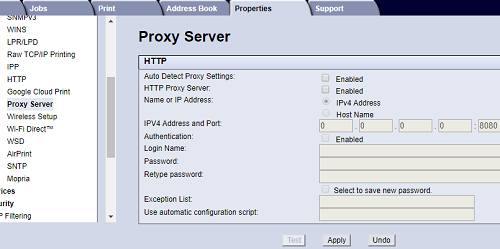
Click Proxy Server.
To configure the printer to detect proxy settings automatically, for Auto Detect Proxy Settings, select Enabled.
Note: If Auto Detect Proxy Settings is enabled, you cannot edit the fields for HTTP Proxy Server, Name or IP Address, and IPV4 Address and Port.For HTTP Proxy Server, select Enabled.
Select the Name or IP Address type.
Type the appropriately formatted address and port number.
If your proxy server requires authentication, for Authentication, select Enabled.
If authentication is enabled, for Login Name, type the login name for the proxy server.
Type the password, then type the password again to verify.
To save the new password, click Select to save new password.
To add a proxy exception list, for Exception List, type the URL.
To use the configured default proxy settings script, for Use automatic configuration script, type the URL.
Click Apply.