Parts of the Printer Specifications
- Product support for
- PrimeLink C9065/C9070 Printer
- Article ID
- KB0383947
- Published
- 2019-10-08
Front View
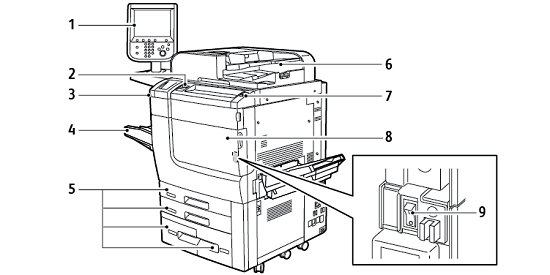
Control Panel
USB Port
Stylus
Tray 5 (Bypass)
Paper Trays 1–4
Duplex Automatic Document Feeder
Power On/Off Button
Front Cover
Main Power Switch, located behind the front cover
Document Feeder
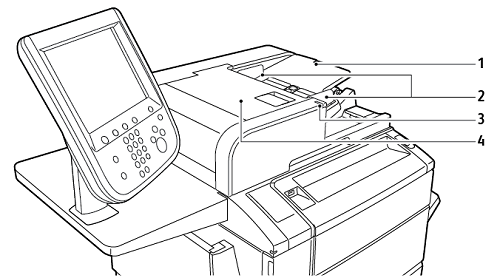
Document Feeder Tray
Document Guides
Confirmation Indicator
Top Cover
Note: The document glass is located under the automatic document feeder and is used for scanning, faxing, and copying. Use the document glass for single pages or paper that cannot be fed using the automatic document feeder.
Paper Trays
Paper Trays 1 and 2
Trays 1 and 2 are identical. Each tray has a capacity of 520 sheets of 75 g/m² paper. The trays accommodate paper weights 64–300 g/m² (18 lb. Bond to 80 lb. Cover) and are fully adjustable for all stock sizes in the range 182 x 140 mm (7.2 x 5.5 in.) to 330 x 488 mm (13 x 19.2 in.). All stock types, including pre-formatted paper and letterhead, can be used, except envelopes. Stock can be loaded either long- or short-edge feed, in portrait or landscape orientation.
Paper Trays 3 and 4
Tray 3 holds up to 870 sheets of A4 or Letter paper.
Tray 4 holds up to 1140 sheets of A4 or Letter paper.
Bypass Tray (Tray 5)
The bypass tray is a paper tray on the left side of your machine. The tray can be folded away when not in use. The bypass tray accommodates all types of stock in the range 182 x 140 mm (7.2 x 5.5 in.) to 330 x 488 mm (13 x 19.2 in.). The tray has a capacity of approximately 250 sheets of 90 g/m² Bond paper.
Offset Catch Tray
The Offset Catch Tray (OCT) is an output tray that can hold up to 500 sheets of paper and allows each set or stack to be offset from the previous to enable easy separation.
Internal Components

Toner Cartridges
Drum Cartridges
Main Power Switch
Fuser
Waste Toner Container, located behind the cover
The main power switch is one of three power switches or buttons to power on the device.
Right-Side View
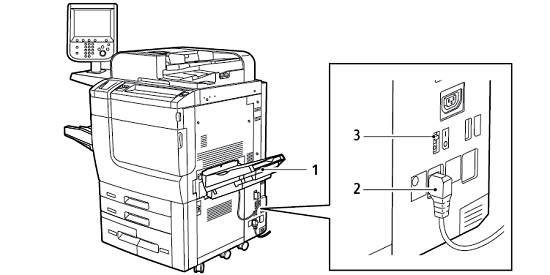
Output Tray
Power Cord
Ground Fault Interrupt Switch
Control Panel
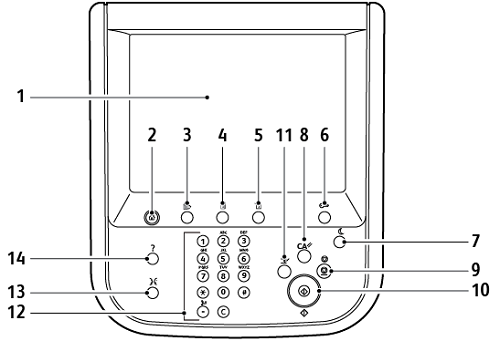
Item | Name | Description |
|---|---|---|
1 | Touch Screen | The touch screen allows you to select all the available programming features. The screen displays fault clearance procedures and general machine information. |
2 | Services Home | Allows access to the All Services screen where all installed features can be viewed and programmed. |
3 | Services | The Services button takes you to the last Service screen accessed. |
4 | Job Status | Displays job progress information on the touch screen. |
5 | Machine Status | Displays the status of the machine on the touch screen. |
6 | Log In/Out | Provides password-protected access to the System Administration menu used to adjust the defaults of the machine. |
7 | Power Saver Button | If the Power Saver option is selected, the machine immediately enters an energy-saving mode. If there are any jobs in the queue, a second screen appears. |
8 | Clear All | If pressed once, resets the default settings and displays the first screen for the current pathway. If pressed twice, resets all the features to machinedefault settings. |
9 | Stop | Temporarily stops the current job. To cancel or resume your job, follow the onscreen instructions. |
10 | Start | Starts the job. |
11 | Interrupt | Temporarily stops the current job to allow a priority job to run. |
12 | Keypad buttons | Type letters and numbers when entering values or a password. |
13 | Language | Press to change the touch screen language and keyboard settings. |
14 | Help | Access the Online Help system. |
Telephone and Fax Connection Options
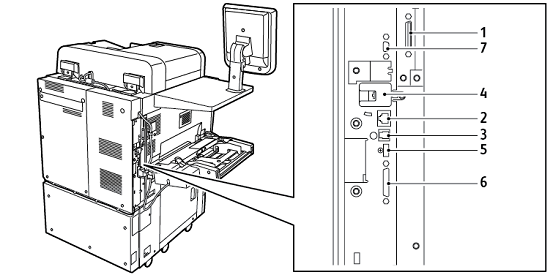
Digital Front End Video Select Switching Circuit (DFE VSEL)
Ethernet Connection
A to D Connection
Fax Connection; port is covered unless fax option is purchased
Control Panel Connection
DADF (Duplex Automatic Document Feeder) Connection
Foreign Device Interface Connection.