Configure a Static IP Address, Subnet Mask and Gateway Address
- Product support for
- WorkCentre 5945/5955
- Article ID
- KB0139773
- Published
- 2017-02-03
Configure the TCP/IP Settings From the Control Panel:
Login to System Administrator mode on the Control Panel. See the Related Content for additional information.
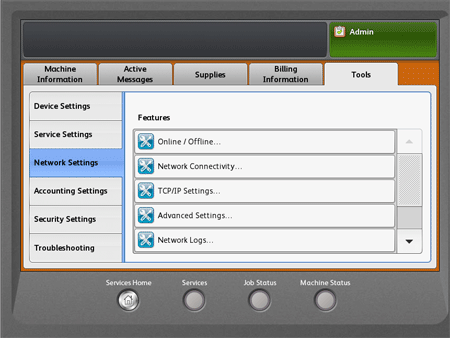
Select Network Settings.
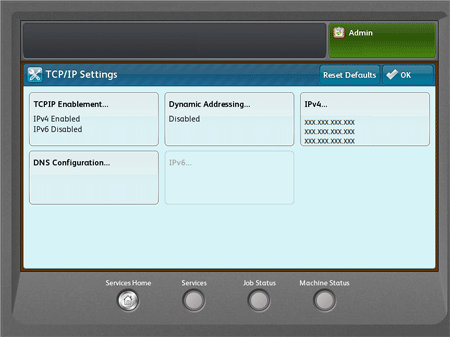
Select TCP/IP Settings. The Network Settings screen will be displayed.
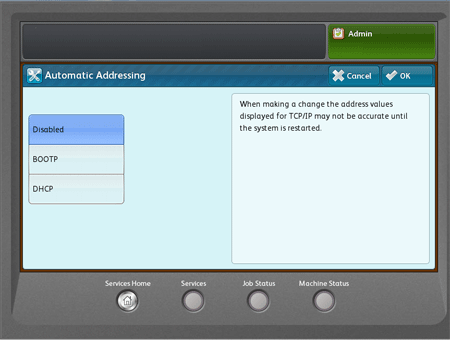
Select the Dynamic Addressing option. The Automatic Addressing screen will be displayed.
Select Disabled then select OK.
Select the IPv4 option. The Internet Protocol screen will be displayed.
Select the IPv4 Address field. The IPv4 Address screen will be displayed.

Enter the IP address using the Touch Screen keyboard then select OK.

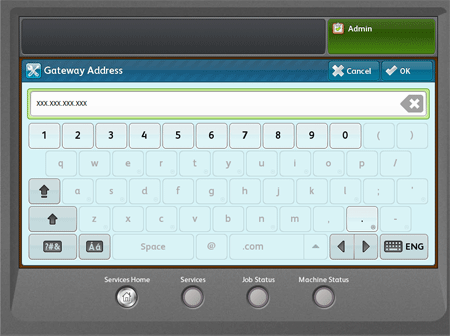
Select the IP Gateway field. The Gateway Address screen will be displayed.
Enter the gateway address using the Touch Screen keyboard and then select OK.
Select the Subnet Mask field. The Subnet Mask screen will be displayed.
Enter the subnet mask using the Touch Screen keyboard then select OK.

Select OK.
IMPORTANT: If you will be using host names, DNS needs to be configured. See the Related Content for additional information.Logout of System Administrator mode. See the Related Content for additional information.
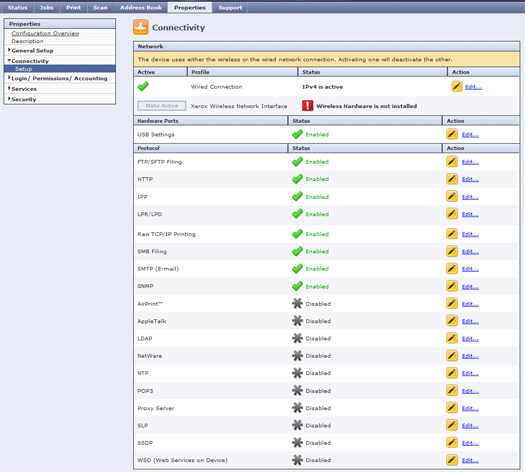
Configure the TCP/IP Settings Using CentreWare Internet Services (CWIS):
Access CentreWare Internet Services (CWIS) and if necessary, login as System Administrator. See the Related Content for additional information.
Click on the Properties tab.
Click on Connectivity on the left side of the window.
Click on Setup. The Connectivity window will be displayed.
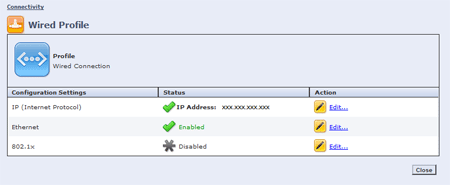
Click on Edit beside Wired Connection from the Network section.
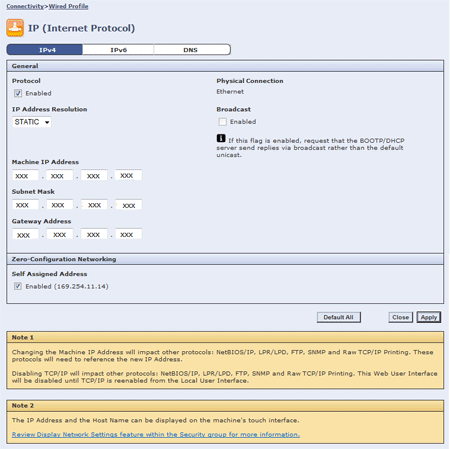
Click on Edit beside IP (Internet Protocol).
Do one of the following:
If using IPv4:
Click on the IPv4 tab or click the Show IP4 Settings button.
If necessary, click the Enabled check box to enable the protocol.
Select Static as the resolution from the IP Address Resolution drop down menu.
If necessary, click on the Enabled check box to broadcast the IP information.
Enter the IP address in the Machine IP Address field.
Enter the Subnet Mask address in the Subnet Mask field.
Enter the Gateway address in the Gateway Address field.
If necessary, place a check mark in the Enabled check box of Self Assigned Address section.
Go to the next step.
If using IPv6:
Click on the IPv6 tab at the top of the screen.
Click on Enabled from the Protocol section to enable the protocol.
To allow the router to assign address prefixes, under Stateless Addresses, select UseRouter Supplied Prefixes
To select how DHCP operates for IPv6, under Default Dynamic Host Configuration Protocol (DHCP) Settings, select an option.
To enter an address manually, under Enable Manual Address, select Enable Manual Address. Select a Router Prefix from the menu, or type a new router prefix, then click Add.
Enter the address in the field.
Go to the next step.

Click on Apply.
NOTE: To default the IP settings, click on the Default All button.
IMPORTANT: If you will be using host names, DNS needs to be configured. See the Related Content for additional information.